How to Reserve Items for Customers in Your Shopify Store
Shopify items reservations are easy to make, and even easier to boost for better customer experience.




Published June 23, 2024.

Pre-orders and product reservations are important for both Shopify store owners and your customers. Why? Because they mean you can plan your inventory well, while ensuring your customers get their hands on what they want. It's a great way to foster trust and keep customers happy.
Luckily, it's easy to set up preorders—or draft orders—in your Shopify dashboard. Below, we'll show you how, and we'll share a handy tool to make sure you never run out of stock again.
» Check out other ways to increase online sales on Shopify.
Why You Should Reserve Items for Customers on Shopify?
In Shopify, when you reserve an item, it means you’re creating a draft order for your customer. This way, you’re ensuring that the item stays available in your customer’s cart until they complete their purchase.
Shopify store reservations are important for both customer experience and inventory management. They offer:
Better customer experience: Reserving items ensures they are available for specific customers and reduces stockouts. This practice also makes customers happy and keeps them coming back.
Streamlined process: Item reservation simplifies inventory management and allows for precise stock allocation. It prevents problems with having too much or too little inventory.
Clear inventory status: Earmarking items for customers clarifies availability and timelines.
Overall, enabling reservations in a Shopify store is a great way to manage customer expectations.
How to Set Up a Reservation in Shopify
Shopify's draft order allows you to reserve items for customers. This is a built-in feature that eliminates the need for custom coding and third-party apps.
You can easily reserve items in Shopify by taking the following steps:
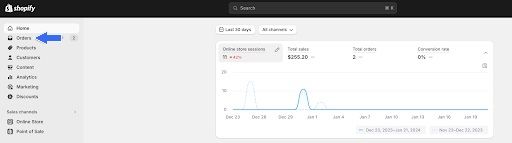
1. Go to your Shopify admin and click the Orders tab on the left.
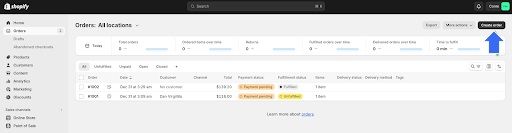
2. Initiate a draft order by clicking the Create order button on the top right of the orders page.
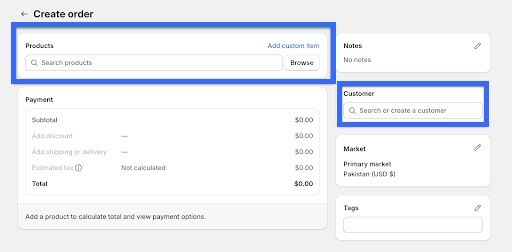
3. Search for the item you’d like to reserve and assign a customer to it using the relevant fields.
4. Once selected, click the Reserve Items at the top of the order details.
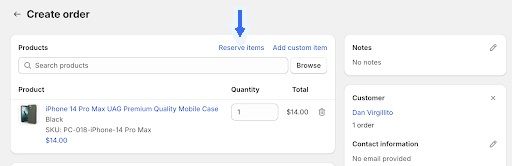
5. Choose a date and time for how long the reservation should last. You can either go with the default suggestion or enter your own using the Custom option. Click Done once you’re set.
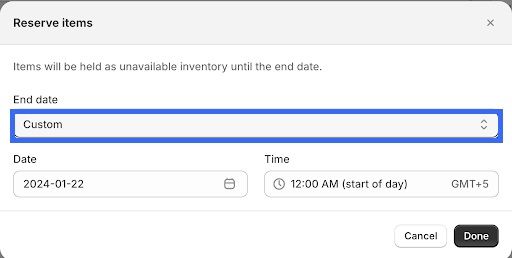
6. And that’s it. Now you just need to save the draft order and the item will be reserved for your customer.
Extra Options and Add-Ons for Shopify Reservations
Shopify reservations may seem simple enough, but there are ways to use them to further optimize your Shopify store.
Shopify Reserve Items Personalization
Consider pairing your reservation system with personalized follow-ups to create a sense of urgency and exclusivity. This can turn reserved items into confirmed sales more effectively.
Follow-ups can be done through:
- Post-reservation emails
- Push notifications
- Appointment shopping
- Popups
- Shopify store chat
- Friendly email reminders
- Re-targeting ads
Time Limits and Added to Cart Reservations
Tools like Conversion Pro Plus allow you to set time limits on a Shopify store reservation.
The lock checkout time feature starts a countdown for the reserved item. Once the time expires, if no purchase has been made, the item is back in circulation.
Additionally, Conversion Pro Plus can make reservations for the products customers added to their carts. To reserve items in a Shopify cart, use the Real Reserved Cart button.
Out-of-Stock Alerts
Reservations hinge on the availability of Shopify products. To ensure your Shopify reserve inventory is full, use tools like Out-of-Stock Police.
Not only does this tool keep tabs on low stock and stock statistics, but it automatically changes the order of Shopify products and pushes the low-stock products to the bottom of the store. This way, customers are less likely to try and reserve a product that's out of stock.


Out-of-Stock Police
Shopify store owners: Manage inventory with ease
Read reviewLaunched
2017
Customer support
24/7 availability
Free trial
7-day free trial
Automated workflows
Save time with seamless processes
Brief overview
Out-of-Stock Police by EGNITION is a powerful tool designed to optimize and automate the management of out-of-stock items in your Shopify store. The app ensures a streamlined process, automatically pushing sold-out products to the bottom of collections or hiding them until restocked.
Out-of-Stock Police offers a straightforward interface, though setup may take a little time for automated workflows. Its natural integration with Shopify and available customer support make it an excellent choice, especially for beginners.
Specifications
- Push sold-out products in collections automatically in real-time.
- Hide out-of-stock products the smart way to keep organic traffic.
- Receive low-stock and out-of-stock notifications to your email or in-app.
- Export and download low-stock and out-of-stock products for re-stock planning.
- Improve SEO and generate more assisted conversions with out-of-stock products.
Pros and cons
Free plan available for up to 49 products.
Easy-to-use interface for efficient inventory management.
Customized sorting rules for tailored product displays.
Automated workflows to save time and effort.
Boosted SEO performance for increased visibility.
Can have a slight learning curve.
» Uh-oh, products sold out? Learn what to do with out-of-stock products on Shopify.
From Easy Reservation to a Happy Checkout
Creating a Shopify reservation for customers in your store is a straightforward process with many benefits.
But the goal isn't to stop at a full cart.
With a few Shopify store tweaks and follow-ups, you can turn reservations into sales and gain happy, loyal customers.