Managing Products on Shopify
Published June 25, 2024.

Adding products to Shopify can feel overwhelming as a new store owner. After all, you’re trying to get used to a new platform while hurrying to get your shop up and running.
The good news is adding products to Shopify is pretty easy in most cases. However, it is important to manage your products and sort them in a way that’s irresistible to your target audience.
HOW TO ADD PRODUCTS TO SHOPIFY
Firstly, if you’re wondering how to add products to Shopify, it’s a super simple process.
- Log in to your Shopify account.
- From your Shopify admin, find the “Products” tab and then click “All products“.
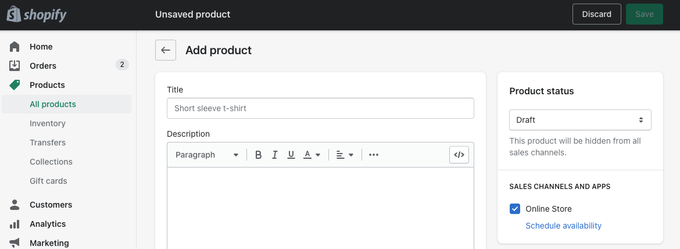
- From the “Products” page, choose “Add product.”
- Fill in your product information.
- Click “Save“.
UPLOADING YOUR PRODUCT DETAILS
You need to convey essential information about each item to make it more attractive to a prospective buyer.
In other words, make sure your product pages have the following details to cover every possible question a potential customer may have:
- Product Title: Keep it short, concise, and descriptive.
- Description: Focus on your product benefits but cover the features too. Keep every product description original and informative. Use copywriting techniques to influence a purchase without being too salesy.
- Product Type: Enter a word or phrase that aligns with the product’s category. For example, if you sell fashion and you’re adding a pair of men’s pants to your Shopify store, place it into the “Jeans and Pants” category or simply “Men’s Clothing.” This will help visitors find what they need when searching your site for a specific term.
- Product Vendor: If you sell own-label merchandise, input your brand name. Alternatively, you can put the manufacturer or supplier of the item.
- Product Images: Provide as many relevant images as possible so a potential customer has full transparency of what they may buy. Make sure they’re high in quality, clear, and you have full permission to use them.
Under the “Inventory and Variants” section, you can also add your product SKU, price, shopping options, and weight. Then you can click the “View on your website” link to ensure that everything is in order.
Need to edit your product details? Just return to the “Products” tab and select the name of the product you want to amend.
HOW TO DUPLICATE A PRODUCT
How to add products to Shopify to save time? Well, just duplicate a similar product.
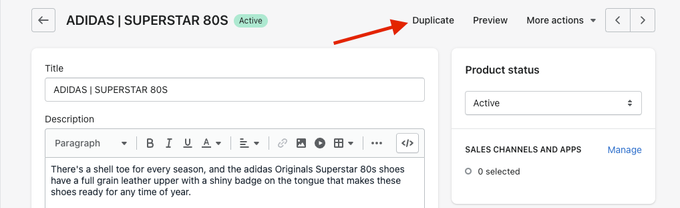
- Select the “Products” tab and click “All products” from your Shopify admin.
- Click on the name of the product you want to duplicate and select the “Duplicate” checkbox.
- Enter the name of your new, duplicated product.
- Click “Duplicate“.
- Modify the product details.
You’ll also have the option to copy the images, SKUs, barcodes, and/or inventory quantity across. However, if you don’t select any of these details, they will be left blank in the duplicated item.
The status of your duplicated product will be set to “draft” and won’t be visible on your sales channels initially. You must first change the status to “active.”
Want to add options to an existing product instead, such as color or size? In this case, add a variant by finding the “Variants” section of the “Add product” page and clicking “Add variant.”
HOW TO ADD PRODUCTS TO A COLLECTION
Figuring out how to add products to a collection on Shopify is quite straightforward.
CREATING MANUAL COLLECTIONS
Collection on Shopify is like a category, such as the “Men’s Clothing“, for example. You can create a manual collection in just a couple of clicks:
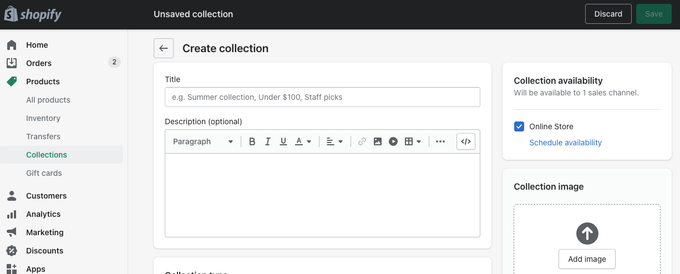
- From your Shopify admin, select the “Products” tab and then “Collections.”
- Click “Create collection” and enter a relevant title, description, and image (if desired).
- In the “Collection type” section, select “Manual” and then click “Save.”
Then go to your “Sales channels” section and select “Manage” to allocate the sales channels where you want your collection to be available.
ADDING PRODUCTS TO EXISTING COLLECTIONS
If you already have your manual Collections set up and you just want to know how to add products to collections on Shopify that are existing, keep reading.
- From your Shopify admin, go to “Products” and then “All products“.
- Find the product you want to add to a collection and scroll down to the “Collections” section.
- Select one or more existing collections and click “Save“.
There is another way when it comes to how to add a product to a collection via Shopify.
- From your Shopify admin, head to “Products” and then “Collections“.
- Select the name of the collection to which you want to add a product.
- Find the “Products” section and select “browse” or search for the product to add it to the collection.
Then all you need to do is save your changes.
CREATING AUTOMATED (SMART) COLLECTIONS
As well as creating manual Collections, Shopify store owners have the option of using tags to create automated Collections. To do this, follow the steps below.
- From your Shopify admin, go to the “Collections” tab and add a title, description, or image for your collection.
- Find the “Type” section and select “Automated“.
- Choose the conditions your products need to meet to be grouped into that collection.
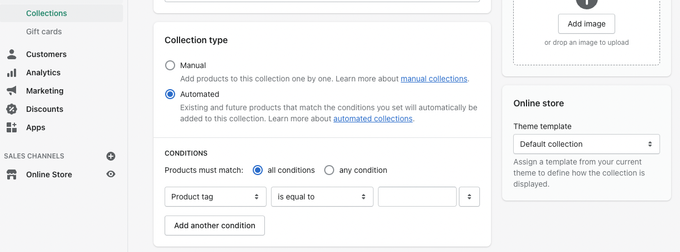
For instance, for a product to automatically go into a “Men’s Pants” collection, it may need to include tags like “jeans” or “chinos.”
Click “Save“, and your automated Collection is good to go!
HOW TO HIDE OUT-OF-STOCK PRODUCTS
There are two main ways to prevent out-of-stock products from being visible in your collections. The idea is to reduce clutter in your online store and avoid disappointing your customers who may get excited when they first see a product, only to realize later that it’s sold out.
HIDE OUT OF STOCK PRODUCTS: SHOPIFY WAY
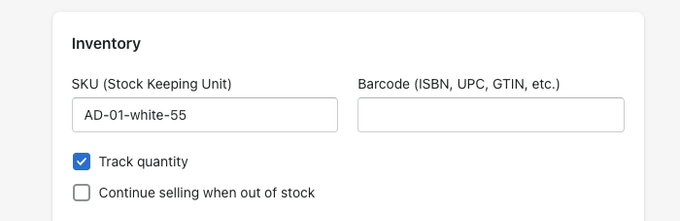
To hide out-of-stock products from your collections using Shopify, you must enable inventory tracking. This aims to automatically monitor the inventory level of every product in your store.
- From your Shopify admin, visit “Products” and then “All products.”
- Find the product or variant you want to track and scroll down to the “Inventory” section.
- Select “Track quantity,” and then you also have the option of checking “Continue selling when out of stock.”
- In the “Quantity” section, input your product quantity for each location before hitting “Save.”
Next, change the automated Collection conditions on each Collection page.
- Where it says “Products must match,” select “all conditions.”
- For “Inventory stock,” select “is greater than” and enter “0.”
Has a particular product gone out of stock but will it be back in stock soon? It will appear in your collections again once you receive inventory. However, this method works for smart / automated collections only.
HIDE OUT-OF-STOCK PRODUCTS USING A SHOPIFY APP
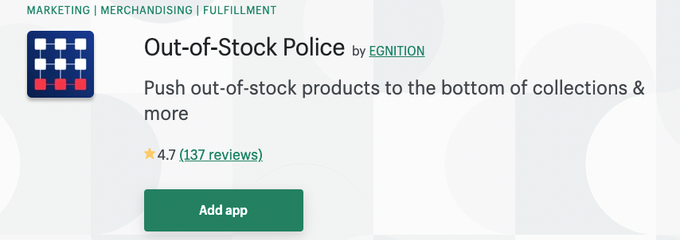
This app is handy because it can:
- Show out of stock products on Shopify but organize them and push them to the bottom of your Collections
- Hide out-of-stock products completely by setting a delay in days if they’re not back in stock by then
- Create a redirect to the specified page when a product is hidden to preserve SEO and organic traffic.
- Allow you to see low stock and out-of-stock statistics for every Collection in your store
- Helps with the re-stocking process by sending alerts for low-stock products or completely sold-out products to your email.
Plus, it requires minimal effort to download, set up, and manage.
HOW TO SORT PRODUCTS ON SHOPIFY
Lastly, let’s talk about Shopify – how to sort products.
How you present the products in your online store is essential. You must deliver a positive user experience, given that 77% of digital window shoppers make impulse purchases.
USING THE SHOPIFY “SORT PRODUCTS” FEATURE
By default, your products are sorted in Shopify alphabetically by product title. You have a few other different sorting options, such as:
- Best selling product
- Highest or lowest price
- The newest or oldest products
- Manual order
- Product title
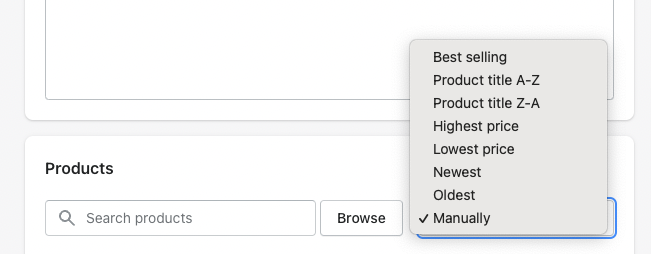
You can also sort your products manually based on your preferences. Here’s how to do precisely that.
- From your Shopify admin, head to “Products” and then “Collections.”
- Choose your Collection and scroll down to the “Products” section.
- Click the drop-down list next to “Sort” and select a sort order.
- Pick “Manually” to click and drag products to the list to reorder them. You can also select specific or multiple products and click “Move” to reorder them.
- Click “Save.”
Sorting and re-sorting products manually, so you can achieve a specific order can take a lot of time and energy.
USING ONLINE MERCHANDISING “BESTSELLERS RESORT” APP FOR SHOPIFY
1

Bestsellers reSort
Auto-sort and organize products in collections
Read ReviewLaunched
2016
Customer support
24/7 availability
Free trial
7-day free trial
Automated workflows
Create a custom order of products in collections
Brief overview
Bestsellers reSort by EGNITION is a powerful asset for Shopify retailers looking to manage inventory effectively while keeping up with dynamic consumer interests. It's more than just an organizational tool; this app provides a powerful way to enhance visibility and tailor product displays to market trends and personal strategies.
With its intuitive setup for online merchandising, Bestsellers reSort simplifies the process of auto-organizing products, making it easier to showcase new arrivals and featured items. It's a practical, balanced solution for efficiently managing inventory and boosting sales.
Specifications
- Automatically sort and organize products in collections.
- Customize sorting rules for every collection based on product type.
- Add featured products to top of collections. Add manually or schedule.
- Organize products using tags and create a very specific order of products.
- Mix and match sorting rules to create a unique sorting order to drive sales.
Pros and cons
Enhances product visibility based on customer preferences
Easily organizes products in collections
Flexible promotion of featured and new items
Manages out-of-stock items effectively
Sorts by various metrics like revenue, sales, etc.
Reduces manual effort in product organization
A slight learning curve for new users
Advanced features restricted in the free version
You only have to configure it once for ultimate flexibility. Whether you decide to sort by the actual revenue or sales for a certain number of days, or discount, profit, randomly, products views – properly organized collections can help you sell more and increase your Return on Investment (ROI).
There are many ways to sort products using Bestsellers reSort with pinned products, sorting by tags, and so much more. It gives you complete control over how your store and its’ collections look like for a potential customer.
THE TAKEAWAY
Knowing how to add products to Shopify and how to add products to Shopify collections is vital. Managing products on Shopify requires some effort, but it’s an essential part of the eCommerce business.